| |
SUMMARY
gff2ps and gff2aplot programs produce PostScript plots, in this howto we will try to provide some help on handling that PostScript output. The first section provides a set of files with which we have made all the PostScript examples included in this page. Then we will see different tools that are available to display PostScript files at different platforms. We will give some hints on using ghostview and how to convert to other formats too (i.e. to portable document format, referred as PDF from now on). Examples were written on gff2ps output, although this howto provides ideas that can be applied to gff2aplot ouput too.
This howto is addressed not only to those who have to deal with gff2ps/gff2aplot PostScript output for the first time, if they do not have worked with tools to view PostScript files yet, but also for those gff2ps/gff2aplot users that already has such skills and need some tips. Send me an e-mail, your suggestions and/or tricks are warmly welcome.
If you want to learn more about PostScript, there are some web resources you can access from here (we apologize not trying to be so much exhaustive, but we think the following links are a good starting point):
CONTENTS
|
Example files
|

|
GFF input files
We are using the same files from the "Comparing GFF Sources Howto" examples. You can download from there although running gff2ps is not the basic goal now. Visit that page if you want to learn how to apply different customizations to same input files and how to compare GFF sources obtained from the same sequence.
gff2ps customization files
We ran gff2ps on the same GFF input files, using three slightly different customization files, the first one is the same you can find in "Comparing GFF Sources Howto" page. Following table shows the basic differences between them, all the other variables are set to same values:
| |
a4.rc |
|
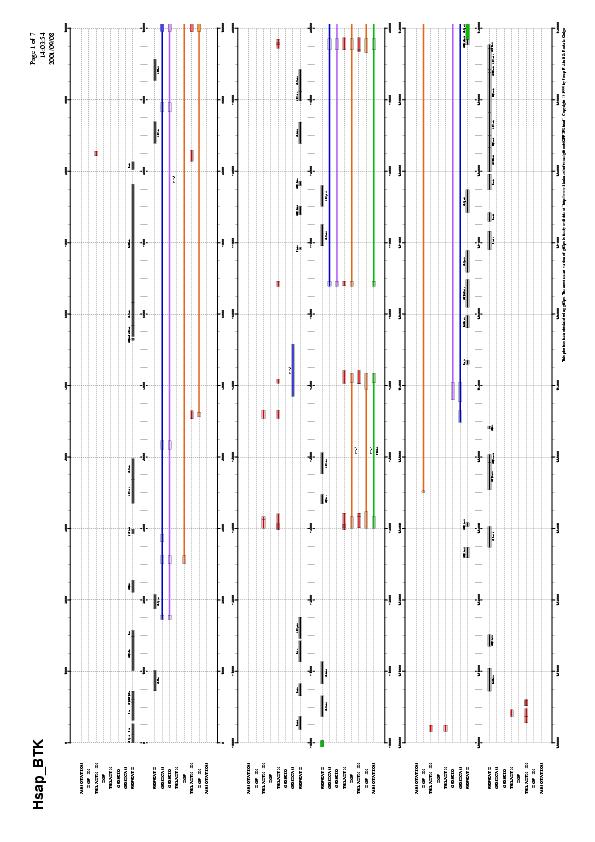
Page size is set to A4 landscape, there are three blocks per page and 10Kbp will appear on each block.
|
| |
a4p.rc |
|
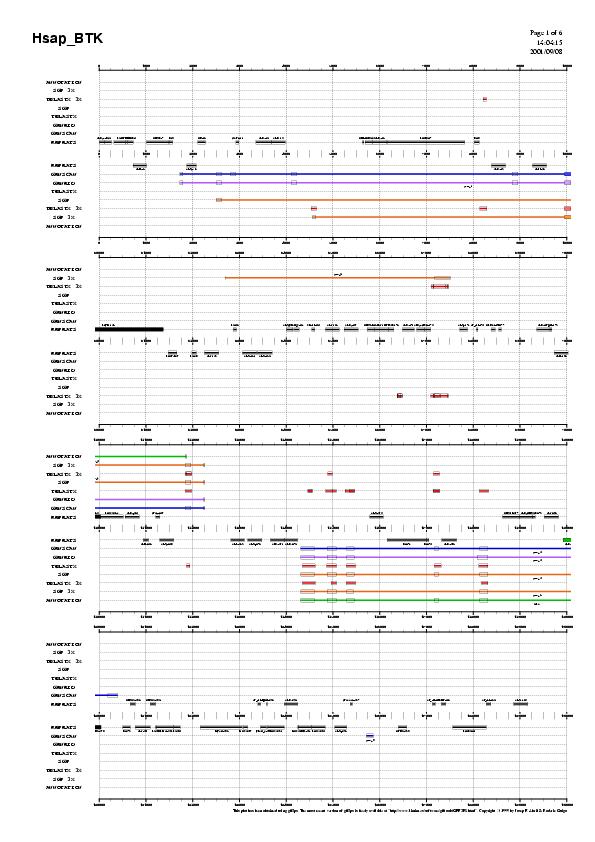
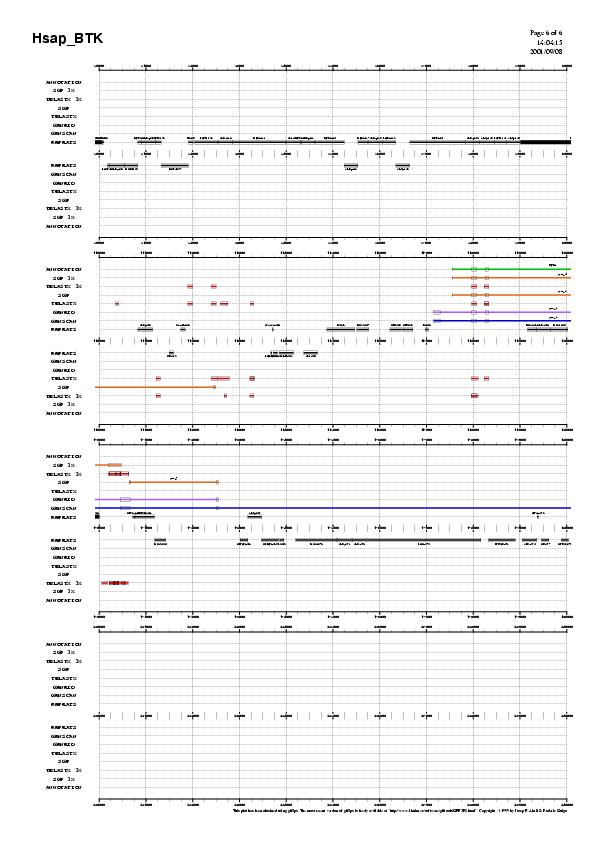
Page size is set to A4 portrait, there are four blocks per page and 10Kbp will appear on each block.
|
| |
slide.rc |
|
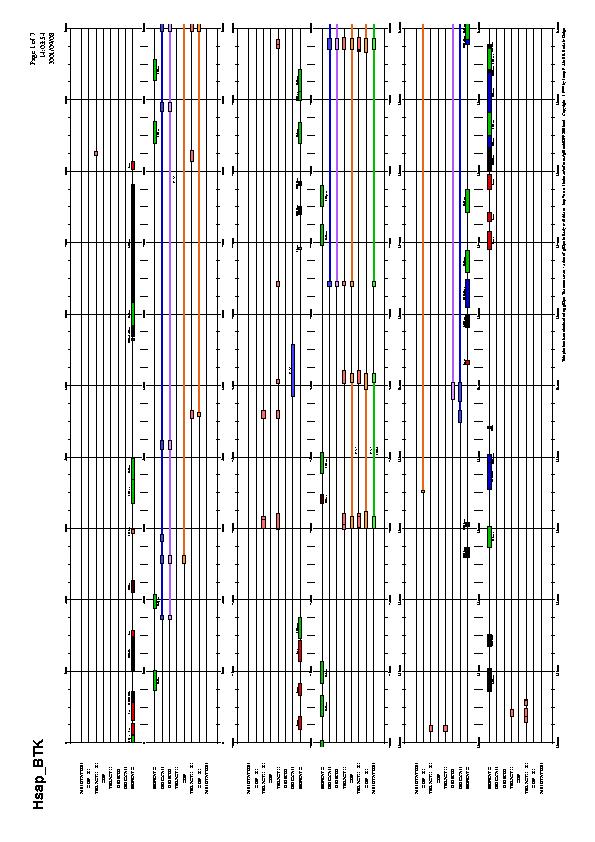
Page size is set to A4 slide format (we will explain it in the section about converting PS to other formats), it has small changes in the page definition variables, but the same data visualization as a4.rc file. |
|
Customization files and available variables are explained in chapter four of the "gff2ps User's Manual".
Running gff2ps
The following command is using a4.rc customization file to produce a landscape version of the figure.
gff2ps -VC a4.rc -- Hsap_BTK_annotation.gff    \

    Hsap_BTK_sgp3X.gff Hsap_BTK_tblastx3X.gff  \

    Hsap_BTK_sgpFO.gff Hsap_BTK_tblastxFO.gff  \

    Hsap_BTK_geneid.gff Hsap_BTK_genscan.gff   \

    Hsap_BTK_repeatmasker.gff                  \

    > ALL_a4.ps 2> ALL_a4.log
|
You can run gff2ps on the same files with the other custom files and produce the PostScript plots we are going to use in this howto, which are listed in this table:
So, modifying the plot layout is easy once you know what the customization variables mean and what parameters are available. Please refer to User's Manual to learn more about those variables and the customization files.
|
Visualizing PostScript Files
|
|
One of the major advantages of PostScript is that it is a device independent page definition format (at least if your printer supports PostScript). But it is also a powerful interpreted programming language, this means that if you have an interpreter then you can run a PostScript document with it and produce a figure as a result of the program execution (like gff2ps output does). The figure can be printed or sent to a display depending on where is the interprer being executed. Here we are going to describe some of the ways one can handle and visualize such documents, because printing is easy if you have a PostScript printer (if not, we can still print a PostScript document as some of the programs depicted in this section can be used as filters and get the job done with a non PostScript printer).
Unix/Linux Approach
Some Unix systems include a PostScript viewer (such xpsview, based on or linked to Adobe ShowPS). On the other side, Linux distributions came with ghostscript, and some desktop managers are providing graphical user interfaces to it (such KDE KGhostview) although that it is possible that if there is ghostscript installed in your system you will also have ghostview.
What differences ghostscript from ghostview ? The former is the PostScript interpreter, it can visualize the PostScript output too but you must work with it in command-line (as we will see later in this howto) or shell mode (so you can type PostScript commands directly to the ghostscript prompt). ghostview is a user front-end, with pop-up menus, to ghostscript, so it is easy to interact with PostScript documents. You must visit the ghostview/ghostscript home page, to learn more about this utilities and to download the latest versions. We used GNU Ghostscript 5.50 for making all the related JPEG/PDF files in the examples shown in this howto.
Windows Approach
That gff2ps/gff2aplot were developed as a bash/gawk script, and it only runs on Unix/Linux machines, does not mean that their output cannot be viewed or edited on a PC running Windows. We cannot assure that gff2ps/gff2aplot do not work on Windows, there is a UNIX environment for Windows (CygWin) which also supports bash and gawk, but I did not tested the program with such configuration (if you try, please report to us if you succeeded or not... ;^D).
We will now list the tools we have to work with PostScript files in Windows system. We can find distributions of ghostview than run on Windows (we refer again to the ghostview/ghostscript home page). Then it is straightforward to open a "*.ps" file with ghostview , visualizing and printing it from that program. Take a look to their documentation on how to install in your system, although the Windows versions are very easy to install (just download the compressed installer, unpack and run it, and finally set some configuration values from program customization menu).
A set of tools developed by Adobe, the company who developed the PostScript language and the PDF format, can read/import PS files, we should cite here Adobe PageMaker, Adobe Illustrator, and Adobe Acrobat. The last one contains a nice utility, the Acrobat Distiller, which can convert a PS file into PDF and also has drivers to handle PS files for printing. Finally, we should recall Adobe Acrobat Reader, which is a nice free viewer of PDF documents.
Corel has also a graphics editor, Corel Draw, which can import/export PS/EPS files.
ghostview/ghostscript do not have the same functionality as the Adobe/Corel tools but they are free... ;^D
NOTES on ghostview usage
|
|
Antialiasing and Color Filling
You can visualize PostScript files using ghostview but maybe there is a problem with latest versions of that program (or the underlying PostScript interpreter ghostscript) because color filled shapes are shown empty (just the shape frame) if you have set antialiasing on (which is set by default when you start ghostview , see figure 1). On the other hand, this is not happening if you have Distiller (utility available with Adobe Acrobat ), or you open those PostScript files with Adobe Illustrator (Adobe defined the PostScript language, so it is straighforward that a PostScript program should work with those programs as it does when sending the file to a PostScript printer). Said that, the best current option is to switch off antialiasing from the corresponding pop up menu on ghostview (State menu --> Antialias, as shown in figure 2).
Problems with Page Boundaries
Another issue is, when opening the PostScript files, that they look like they were missing part of the plot. This maybe a result of visualizing with a different page-size than the one defined for the figure. By default, ghostview opens files in A4 or Letter page size. Both formats have small diferences in with/height, so that you will miss a small part of the figure if it was generated in A4 and you are visualizing with Letter size or viceversa. It is worse when you are trying to visualize an A3 (similar to Tabloid/Ledger US format) in an A4 display, because you are missing half of the plot. It is very easy to visualize the whole picture if the PostScript file has defined a BoundingBox (such the gff2ps PostScript output), simply select BBox from the Page Size menu (the button containing the current page size displayed by ghostview, see figure 3). Those files which does not include a BoundingBox definition require that you set the proper page size on that menu.
 |
 |
 |
| Figure 1: Antialias ON. |
Figure 2: Antialias OFF. |
Figure 3: Page Size Menu. |
Click on the previous images to see the snapshots at their real size. |
|
Converting PS to Other Formats
|
|
PostScript figures are built from a set of drawing primitives which we feed with a set of parameters, including coordinates, so what we get is a kind of "vector graphic" that can be rotated, translated and, most important, rescaled (summarizing those three terms, transforming such plot) before rendering in the output device. And like other vectorial graphic formats, as CGM (Computer Graphics Metafile) and SVG (Scalable Vector Graphics, written in XML), you are not going to distort the final output after those transformations.
This is not what happens with bitmap formats in which you have a fixed resolution, they are distorted when you alter their lengths to display/print smaller (you are missing points/lines) or bigger (figure gets pixelixed). Among them we have GIF (Graphics Interchange Format), JPEG (Joint Photographic Experts Group), PNG (Portable Network Graphics), WMF (Windows Metafile Format), TIFF (Tagged Image File Format), and so on.
Given the powerful capabilities of PostScript to handle graphics it sounds extrange trying to convert into another graphical format... ;^D
... but, web browsers do not handle PostScript (that is a pitty, don't you think so?) and it is easier to feed them with bitmaps. In this section we will also explain how to convert PostScript files to PDFs, just because there are many people having viewers for PDF, say here Acrobat Reader, than for PostScript (in Windows of course, but I already told you in the "PostScript interpreters and viewers" section that it is easy to donwload and install a PS viewer on Windows), and maybe you are interested to reach as much people as you can.
Converting PostScript to Bitmaps
Like in Perl, there are many ways to do things...
- Try with an image (screen/desktop/window/selection) capturing software. You can open the PS file with ghostview and take a snapshot of the plot region you want to save as a bitmap. This is a fast method to get a piece of the figure for a presentation. On Unix/Linux systems you can do that with one of the tools included in the ImageMagick package, import, as we did to produce the snapshots for previous section figures (see "NOTES on ghostview usage"):
- Use a software application that can import/load PS/EPS files and save it again with the desired graphic format. This approach is just for incidental conversions but it also allows you to modify the bitmap before saving (clipping, adding notes, changing colors and so on). XV is a good visualization tool that also has some image manipulation options. You can also work with a graphic editing software such the GIMP, Adobe Illustrator, CorelDraw, ... just choose the one with which you will feel comfortable... ;^D
- Try converting with another ImageMagick tool (there is also a Windows version of this software package), here we use convert:
As with the next option, you can "automatize" those conversions for a long set of PS files using simple shell scripts (I do not know if that is also possible on Windows systems but you can take a look to the documentation accompanying that distributions). Two points that must be highlighted: first is that convert does antialiasing by default (see previous section "NOTES on ghostview usage"), second is that PostScript documents with multiple pages produce a numbered bitmap file for each page. In the example above, ALL_a4p.ps has six pages, so convert used ALL_a4p_IM_convert.jpg as base name for six jpg: ALL_a4p_IM_convert.jpg.0 to ALL_a4p_IM_convert.jpg.5.
- Try using ghostscript and one of the available devices. You must check out which devices are installed in your system first, but this is easy as typing:
This will list not only the command-line options and the input formats, you will get a list of devices too, among them you can find: 'x11' screen device series, printer specific devices, portable bitmap, tiff, jpeg and png series, pdfwrite (we will need this device for PostScript to PDF conversion later, in next section), bbox (if you are interested in retrieving plot boundaries).
- Try with a perl interface to ImageMagick or to GIMP and write your own scripts, but this will be so much effort having the previous options (unless you require industrial strenght processing). You can find more information at ImageMagick (PerlMagick object-oriented interface: "Image::Magick") and GIMP (perl bindings by Marc Lehmann: "Gimp", "Gimp::Fu" and so on) perl interaction pages (search at CPAN for the latest stable versions of the modules).
Using ghostscript to produce Bitmaps
I am going to focus here on ghostscript, giving an example of a command-line which produces a JPEG file from one of the PS files produced by gff2ps:
Take care that the input PostScript file is the last parameter of the command-line and that the output file is provided by the -sOutputFile option. We can apply that command-line to our three PS example files and get the results shown in the following table together with the first pages produced by ImageMagick convert:
What issues are raising from that approach ?
- It seems that ghostscript only processed the first page from a document having many. You must include "%d" (as a printf format specification) to output file name, in the example above, -sOutputFile=ALL_a4p%d.jpg. Look at ghostscript man pages for more info.
- Landscape figure appears rotated as if page was defined in portrait. Of course, Portrait and Landscape are different ways to display data/figures within the same page format. Take a look to the following section "Turning Landscape into Sideways".
- Figures have a poor resolution. Then you can increase the resolution of the output with the command-line option -rnumber (to select different X and Y resolutions: -rnumber1xnumber2). For instance, the following table contains the same PS file converted to JPEG at three different output resolutions:
From that table you can see one of the problems related to bitmaps, increasing resolution increases file size too, what does not happen with the PS files.
Converting PostScript to PDF
Before start converting your PS files to PDF you have to think first if you really need to do that. I am not trying to start any visualization format advocacy although it is clear, as this howto maybe reflects, that I am feeling more comfortable working with PostScript than with other graphical formats. Anyway, I recommend you to visit the following links:
Coming back to the section topic, how can we convert PS files to PDF with ghostscript? The command-line options will look like:
ghostscript  -dBATCH  -dNOPAUSE        \

    -sPAPERSIZE=a4  -sDEVICE=pdfwrite \

    -sOutputFile=ALL_a4.pdf ALL_a4.ps
|
We can apply that command-line to our three PS example files and get the following results:
What problems should we find now ?
- Landscape figure appears rotated as if page was defined in portrait. Of course, Portrait and Landscape are different ways to display data/figures within the same page format. Take a look to the following section "Turning Landscape into Sideways".
- Sideways figure (slide) was clipped and it also may have an empty white area. Think that it bounding box definition does not match with the paper size from command-line (in the example we have defined -sPAPERSIZE=a4). This is the same that will happen when converting an A3 page with A4/Letter paper sizes (clipping half of the original page). See also the following section.
Turning "Landscape" into "Sideways"
"Portrait" and "Landscape" refer to different orientations with which you can fill a standard page but both definitions share the same bounding box. This means that while "Portrait" renders a PS element referring to the short edge of the page, "Landscape" do same thing but referring to the long edge, so the page boundaries are the same. As example, in A4 you will have a short edge of 21cm (8.3 inches) and a long edge of 29.7cm (11.7 inches). To produce truly "Sideways", a boundaries swaping is required, it is like we forced the "short" edge to be 29.7cm and the "long" edge to be 21cm in the previous example. You can find a nice explanation of such issue in the following link: "The page orientation problem" by Allen B. Downey. In this section we will explain how to apply some of the tips described in that page to gff2ps PostScript output.
First of all, you must find where is gs_statd.ps file located in your system (usually under ghostscript/X.XX/ path, where "X.XX" refers to the latest version of ghostscript you are using in your system). Look for the bold text in the following code block that represents your gs_statd.ps file and add some new lines as shown in the following box:
 ···


/note /letter load def

%


  % sideways definitions

  /slidea3     { 1190 842 //.setpagesize exec} bind def

  /slidea4     {  842 595 //.setpagesize exec} bind def

  /slideletter {  792 612 //.setpagesize exec} bind def

  /slide /slidea4 load def

  % end of sideways defs


%

% End of Adobe-defined page sizes


 ···


/.pagetypenames

  {  /slide /slidea3 /slidea4 /slideletter % sideways page sizes

    /letter /note /legal

    /a0 /a1 /a2 /a3 /a4 /a5 /a6 /a7 /a8 /a9 /a10

    /b0 /b1 /b2 /b3 /b4 /b5

    /archE /archD /archC /archB /archA

    /flsa /flse /halfletter /11x17 /ledger

  } cvlit readonly def


 ···
|
As you can see we use "slide" as an alias to the slide format you are going to use more ("slidea4" in our case).
Next step is to define a new page size/format for a gff2ps the custom file. We define a new bounding box with the layout variable page_bbox, and we force the output to be in Portrait mode with the variable page_orientation (see the "gff2ps User's Manual" for further info). Here there is an excerpt from slide.rc showing values for a sideways A4 page:
 ···


# L #

page_bbox=slide,842,595 # A4 bbox is 595,842

page_orientation=Portrait


 ···
|
We run gff2ps with the slide.rc custom file:
gff2ps -VC slide.rc -- Hsap_BTK_annotation.gff  \

    Hsap_BTK_sgp3X.gff Hsap_BTK_tblastx3X.gff   \

    Hsap_BTK_sgpFO.gff Hsap_BTK_tblastxFO.gff   \

    Hsap_BTK_geneid.gff Hsap_BTK_genscan.gff    \

    Hsap_BTK_repeatmasker.gff                   \

    > ALL_slide.ps 2> ALL_slide.log
|
Then, if you have edited gs_statd.ps file as shown above, you can run ghostscript with one of the new sideways page definitions, as in the following command-line which uses -sPAPERSIZE=slide:
You will finally get an all-sideways PDF document (just like an slide presentation), in our test case ALL_slide.pdf.
|
|